
I’ll rewrite and expand your article with clearer explanations, practical examples, and one unique hack (a shader-based seam-fill technique) you can use in emulation/upscaling to hide those visible artefacts. I’ll keep the same context (aliasing, PS2 GS, upscaling glitches) and add more intuition and small code/pseudocode bits so it’s actionable.
Continuous vs. discrete signals — the key idea
In the real world, many signals are continuous: if point A is very close to point B, then the value at A is similar to the value at B (think of a painted wall — colour changes smoothly). Digital screens are discrete: they show a grid of pixels. Two neighbouring pixels can be very different (white next to black) even though the original scene might have been smooth.
Sampling (turning continuous → discrete) is trivial: pick points from the continuous signal. It reduces data and makes storage/processing possible. But the reverse — reconstructing a continuous signal from samples — is the hard part. Humans expect smooth, continuous images and video. When we try to reconstruct values between samples, those values don’t exist in the sampled data, so we must guess them. That guessing is the origin of aliasing.

What is aliasing, simply?
Aliasing = when you reconstruct or resample a signal, but introduce artefacts because you don’t have enough original information.
Example: two adjacent samples: white and black. What should the in-between pixel be?
- Nearest filtering: pick the nearest sample (white or black). Hard, blocky edges.
- Linear filtering: take a weighted average → grey. Smoother but still only one possible guess.
- Reality could be red, blue, or a pattern — impossible to know from just two samples.
Anti-aliasing tries to produce the best guess for those in-between values using the samples available, so the reconstructed image looks closer to the original continuous signal.
How GPUs and PS2 GS fit in
GPUs/GS draw primitives (triangles, rectangles) as geometric continuous shapes. Internally, they rasterise those shapes into discrete pixels on a framebuffer. The original hardware (PS2) had a fixed, relatively low output sampling rate. Because of that lower sampling, many tiny errors (holes, mis-sampled texels) are below the visible sampling rate — you don’t notice them.
When we upscale (emulate a higher resolution), we increase the sampling frequency. The emulator now samples the same primitive at many more points. Those tiny holes and seams that were sub-sampling-rate on the real PS2 become visible as black lines or noisy pixels — especially noticeable in some Namco games (vertical black lines along rectangle seams).
So paradoxically, a higher-fidelity (higher-res) emulation can expose errors that real hardware hid.

Common upscaling Glitches-visible problems and why they happen
- Holes in primitives
- Rectangles or quads emitted by GS sometimes have tiny gaps due to rounding, clipping, or how edges are defined. At native PS2 output, these gaps are invisible. At higher sampling, they show up.
- Rectangles or quads emitted by GS sometimes have tiny gaps due to rounding, clipping, or how edges are defined. At native PS2 output, these gaps are invisible. At higher sampling, they show up.
- Texture atlas bleeding / invalid sampling
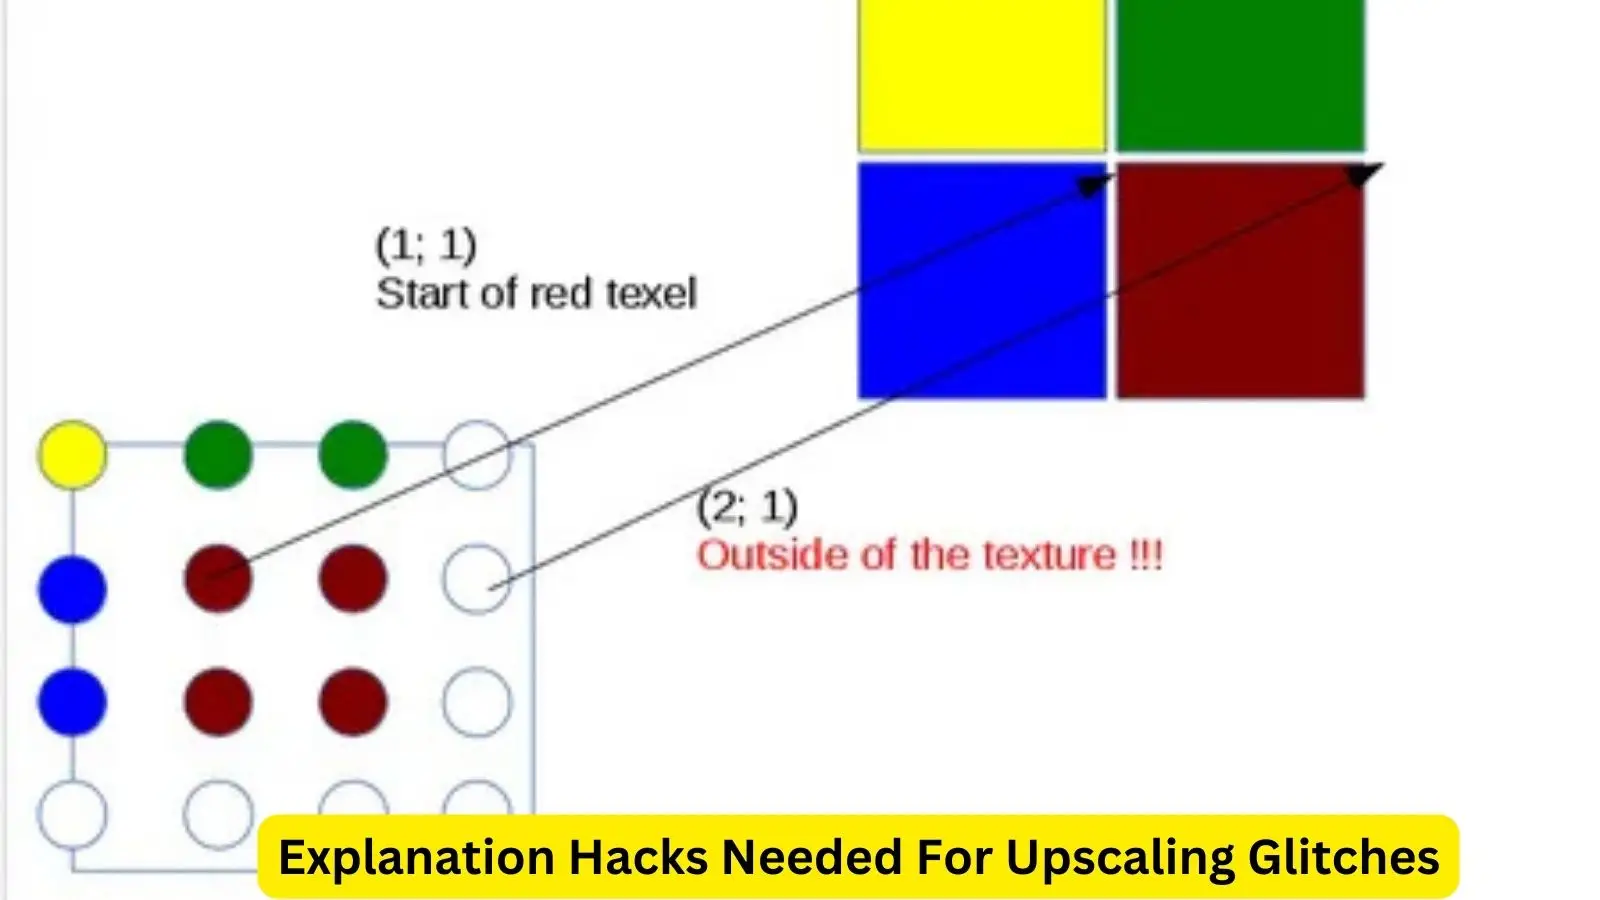
- Small textures (fonts, UI elements) are packed into a texture atlas. When you sample near an edge, linear filtering can pull texels from neighbouring textures because the atlas doesn’t provide safe padding. At 2× or higher resolution, you sample intermediate texels that don’t exist, so you get erroneous pixels (noticeable on fonts).
- Small textures (fonts, UI elements) are packed into a texture atlas. When you sample near an edge, linear filtering can pull texels from neighbouring textures because the atlas doesn’t provide safe padding. At 2× or higher resolution, you sample intermediate texels that don’t exist, so you get erroneous pixels (noticeable on fonts).
- Insufficient texture size for linear filtering
- Linear interpolation needs surrounding texels. If a texture is the smallest possible size (no one-pixel padding), interpolation reads undefined neighbours. On PS 2, this was usually hidden; on modern upscale, it becomes visible.
The two practical hacks you described (explained)
1) Primitive dilation (extend rectangles by half a pixel)
- What it does: Detect tiny rectangle primitives that would produce holes and expand their edges by ~0.5 texel/pixel so adjacent quads overlap and leave no gap.
- Why it works: The small extension fills the sampling gap caused by rounding; the hole disappears at higher sampling rates.
- Tradeoff: Small geometry change — visually harmless in most cases and cheap performance-wise. Corner cases exist (overlap causing tiny bleed), but in practice, it’s a solid fix.
Pseudocode
for each primitive P:
P.size < threshold:

    P.x0 -= 0.5 / outputScale

    P.x1 += 0.5 / outputScale

    P.y0 -= 0.5 / outputScale

    P.y1 += 0.5 / outputScale

  rasterize(P)
2) Texture coordinate rounding and disable extra linear filtering
- What it does: Shift and round texture coordinates so sampling falls clearly inside the intended texel region; disable or limit global linear filtering when it causes cross-atlas reads.
- Why it works: Prevents sampling neighbouring atlas regions. You can also clamp edges or add padding to textures.
- Tradeoff: Some visuals may lose smoothing if linear filtering is disabled. But for tiny UI textures or fonts, crisp nearest sampling plus careful rounding often looks better.

Why do we need one extra texel of padding
Linear filtering blends neighbouring texels. To allow correct interpolation at edges, textures should be at least 1 texel larger (padding or duplicate edge texels). On the PS2, textures were tiny to conserve the 4MB VRAM — they didn’t include padding. Today, we can add padding or replicate edge pixels to emulate what interpolation expects.
My unique addition — Shader-based seam-fill
Beyond primitive dilation and texcoord rounding, you can fix visible seams using a small post-process shader that detects seam-like pixels and replaces them with a local, edge-aware fill. This retains texture filtering while removing black lines and atlas leakage without changing the original geometry or atlas.
Idea (intuitive)
- Detect pixels that look like a seam: strong local contrast but very thin (1–2 px wide), often aligned vertically/horizontally.
- Replace those pixels with a weighted average of neighbouring non-seam pixels using a kernel that respects local gradients (so edges are preserved, only the seam is removed).
Simple GLSL-like fragment shader (concept)
// Input: colour texture at high-res
vec3 seamFill(vec2 uv) {
  vec3 c = texture(colorTex, uv).rgb;

  // Score how "seam-like" this pixel is: high if it's very dark compared to neighbors
  float left = length(texture(colorTex, uv + vec2(-1.0/pw,0)).rgb - c);
  float right = length(texture(colorTex, uv + vec2(1.0/pw,0)).rgb - c);
  float up = length(texture(colorTex, uv + vec2(0,1.0/ph)).rgb - c);
  float down = length(texture(colorTex, uv + vec2(0,-1.0/ph)).rgb - c);
  float seamScore = max(max(left,right), max(up,down));

  if (seamScore < seamThreshold) return c; // not a seam

  //Weighted neighbour average excluding likely seam neighbour direction
  vec3 sum = vec3(0);
  float w = 0.0;
  for (int i=-2; i<=2; ++i) {
    for (int j=-2; j<=2; ++j) {
      vec3 s = texture(colorTex, uv + vec2(i/pw, j/ph)).rgb;
      float dist = 1.0 / (1.0 + float(abs(i))+float(abs(j)));
      sum += s * dist;
      w += dist;
    }
  }
  return sum / w;
}
- pw, ph are texture pixel sizes in UV space; seamThreshold tuned experimentally.
- This is cheap because we only run heavy averaging for pixels that score as possible seams.
Benefits
- Removes thin black lines or atlas bleed elegantly.
- Keeps filtering for most pixels.
- Works as a last-stage cleanup — less fragile than aggressive global filtering changes.
Practical guide checklist for implementers
- Use primitive dilation for very small quads — cheap and effective.
- Add 1-pixel padding for atlas textures (duplicate edges) whenever building texture atlases.
- Use texcoord rounding for UI/font textures to avoid half-texel sampling.
- Prefer clamp-to-edge or manually padded textures instead of repeat when using atlases.
- Use the seam-fill shader as a safe last-step clean-up for stubborn visible lines.
- Tune thresholds per-game; different engines and texture layouts behave differently.
Quick takeaway (TL;DR)
- Upscaling exposes tiny sampling errors that the original PS2 output hid.
- Aliasing + tiny primitive/texture issues → visible lines and artefacts when you emulate at higher resolution.
- Fixes:
- Expand small primitives half-pixel (dilation).
- Round/shift texture coords and add padding to textures.
- Disable or limit dangerous global linear filtering on tiny textures.
- Unique extra tool: use an edge-aware seam-fill shader to remove seam pixels at post-process time.
